How to Sync Records (Ethos)
Element → Ethos#
Records can be synced from Element451 to Ethos either manually or automatically.
During UAT and when connected to a TEST SIS environment, we strongly recommend using manual syncs only. This helps prevent accidental syncing of any production data you might have loaded during onboarding.
Sync Timing
- A typical sync takes 12–15 minutes
- If a record does not appear in the Integration Log immediately, it may still be processing. Refresh the page every few minutes until it appears
Manually Syncing a Record#
- In Element451, open the contact profile you want to sync
- Add the label:
- This will start the integration process.
- Element451 - Trigger Integration Sync
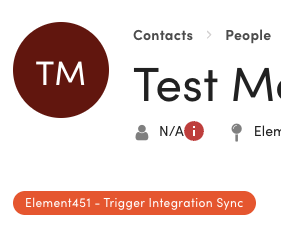
Top of an Element451 contact profile (breadcrumb Contacts > People) for a test contact, 'Test M...' (initials TM). An orange label reading "Element451 - Trigger Integration Sync" appears under the contact's name, showing the label that starts the sync.
- Element451 - Trigger Integration Sync
- Wait 10–15 minutes, then navigate to the Integration Log
- For more details, see Reviewing the Integration Log below
Setting up Automatic Syncs#
- In Element451, navigate to:
- Data + Automations → Automations → Rules
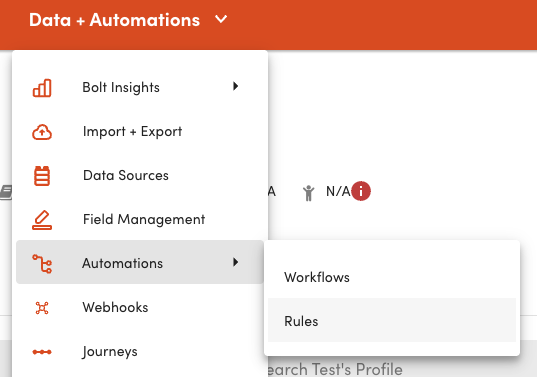
The Element451 top navigation Data + Automations menu is open, listing Bolt Insights, Import + Export, Data Sources, Field Management, Automations, Webhooks and Journeys. Automations is hovered, opening a submenu with Workflows and Rules; Rules is highlighted.
- Data + Automations → Automations → Rules
- Open the rule: Element451 → Ethos Integration Sync
- Under Triggers, add conditions to automatically start the sync. Common triggers include:
- Application Submitted
- Decision Released
- Changes are saved automatically. You can exit once updates are complete.
Sync Behavior#
Once triggers are configured:
- The integration will run automatically when conditions are met
- Sync results can be monitored in the Integration Log
Ethos → Element#
By default, updates from Ethos (SIS) are triggered by changes made in the SIS.
- These changes are captured through the Ethos Change Notification (Subscription) system
- For more details, see the Functional Overview or Technical Overview
Optional Manual Sync#
Element451 also provides an optional process to manually pull data from Ethos into Element451 without requiring a change in the SIS.
- This uses a label + rule within Element451
- The rule is inactive by default and must be enabled before use
Important
- This process is intended for one-off scenarios only
- It should not be automated or scheduled without consulting Element support
Activating the Rule#
This only needs to be completed once.
- In Element451, navigate to: Data + Automations → Automations → Rules
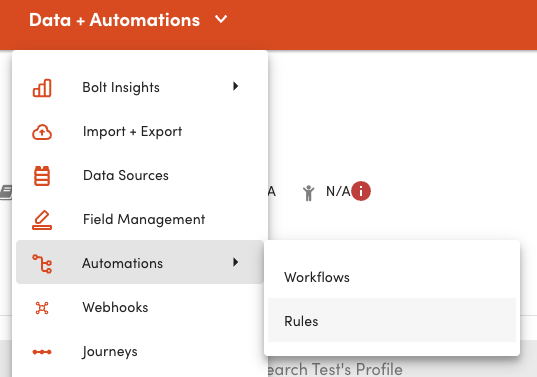
The Element451 top navigation Data + Automations menu is open, listing Bolt Insights, Import + Export, Data Sources, Field Management, Automations, Webhooks and Journeys. Automations is hovered, opening a submenu with Workflows and Rules; Rules is highlighted. - Open the rule: Ethos → Element451 Integration SyncNote: If the rule is not available, contact Element support to have it added.
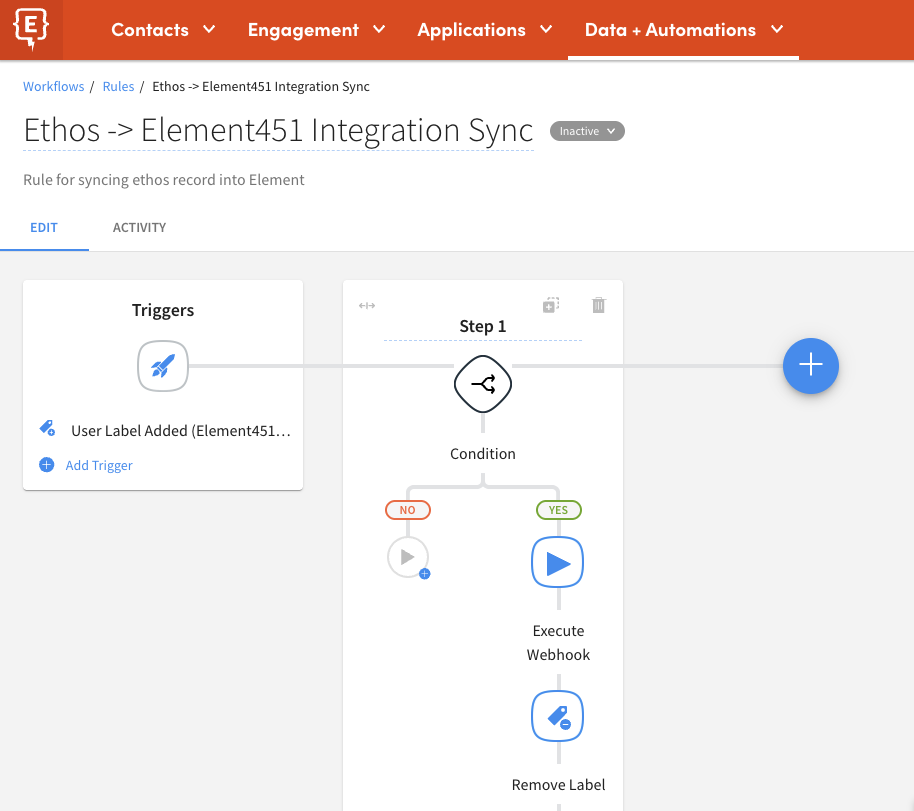
The Element451 rule editor (breadcrumb Workflows / Rules) for 'Ethos -> Element451 Integration Sync', described as 'Rule for syncing ethos record into Element'. A grey Inactive status dropdown sits beside the title, which is the setting to change to Active. The Edit tab shows a Triggers card with 'User Label Added (Element451...' and Step 1: a Condition whose Yes branch runs Execute Webhook, then Remove Label. - Set the rule status from Inactive → Active
- Exit the rule setup
Manually Syncing a Record from Ethos→Element#
- In Element451, open the contact profile you want to sync
- Add the label: Element451 - Trigger Ethos to Element Sync
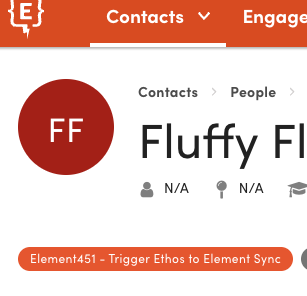
Top of an Element451 contact profile (breadcrumb Contacts > People) for a test contact, 'Fluffy Fl...' (initials FF). An orange label reading "Element451 - Trigger Ethos to Element Sync" appears under the contact's name, showing the label that starts the sync. - Wait 10–15 minutes, then navigate to the Integration Log
- For more details, see Reviewing the Integration Log below
Reviewing the Integration Log#
The Integration Log is a critical tool for monitoring the status of integration activity.
It shows:
- Which records successfully synced
- Which records encountered errors
- Details needed to troubleshoot issues
We recommend reviewing the Integration Log at least daily to identify and resolve issues early.
Accessing the Integration Log#
- In Element451, navigate to: Profile Picture (top right) → Settings → Integrations
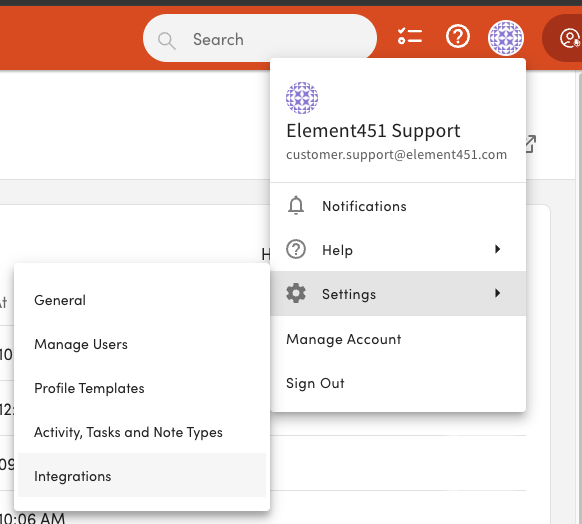
The profile picture menu at the top right of Element451 is open, showing Notifications, Help, Settings, Manage Account and Sign Out. Settings is hovered, opening a submenu with General, Manage Users, Profile Templates, Activity, Tasks and Note Types, and Integrations; Integrations is highlighted. - Select Integration Log from the left-hand menu
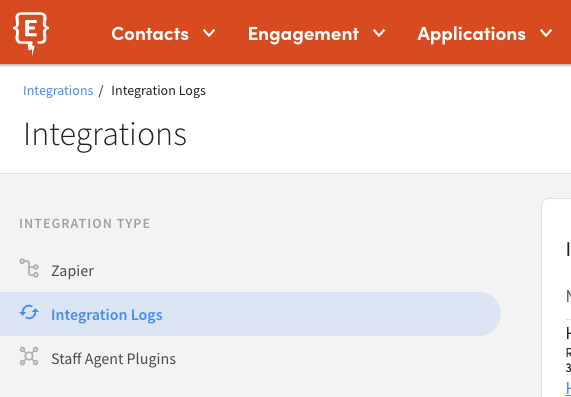
The Element451 Integrations settings page (breadcrumb Integrations / Integration Logs). The left-hand Integration Type menu lists Zapier, Integration Logs and Staff Agent Plugins, with Integration Logs selected. - The most recent sync records will appear at the top
How to Read the Integration Log#
Columns:

Each row represents a sync attempt. The columns include:
- Name
- The name of the student or record
- Type
- The direction and type of sync
- Status
- In Progress → Sync is currently running
- Success → Sync completed with no errors
- Error → One or more errors occurred
- Processed At
- Date and time the sync was processed
- Error Summary
- A brief description of the first error encountered
- Error Details
- Available via the ⋮ (ellipsis) menu
- Select View to see:
- Full error message
- Payload and API details (if applicable)
Important
An Error status does not always mean the entire sync failed.
- Some parts of the record may have synced successfully
- Errors may be limited to specific components (e.g., application, previous school)
Review the Error Details to understand the full impact.
Integration Log Controls
#

- Search (🔍)
- Search records by student name
- Filter
- Filter by:
- Status (Success / Error)
- Sync type/direction
- Date range (Processed At)
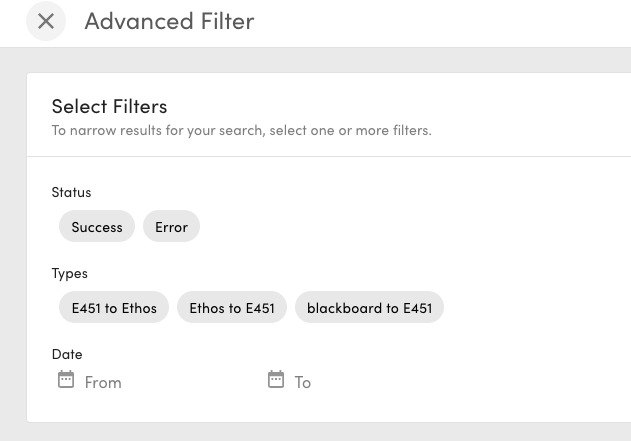
The Advanced Filter panel of the Element451 Integration Logs, headed 'Select Filters'. It offers Status chips (Success, Error), Types chips (E451 to Ethos, Ethos to E451, blackboard to E451), and a Date range with From and To date pickers. A blackboard to E451 type appears because this instance has another integration.
- Paging
- Navigate through multiple pages of results
- Filter by:
Viewing Details of an Error#
When reviewing an error in the Integration Log, it is important to look at the full set of error details, not just the summary.
- A single sync can contain multiple errors
- Scroll through the error details to review all issues associated with that sync
- Some errors may not be critical, while others may block key parts of the process
Understanding the Error#
Most errors originate from Ethos or the SIS.
Element451 typically provides:
- The error message returned by Ethos
- The API endpoint that was called
- The payload (data) sent during the request
Together, this information helps identify:
- What action was being attempted
- What data was sent
- Why the error occurred
Troubleshooting Steps#
- Review the full error details in the Integration Log
- Check Element451’s error documentation for known issues: Integration Errors - Troubleshooting (Ethos)
- Search the error message in Ellucian’s Customer Center: https://elluciansupport.service-now.com/customer_center (opens in a new tab)
- If the issue cannot be resolved, contact Element451’s Live Support: How to Work with Live Support (Managed Integrations)
Note
- Some errors may be specific to your SIS configuration
- Because Ethos/SIS is managed by Ellucian, you may be directed to open a ticket with Ellucian support
Re-Syncing a Record#
Once the issue has been resolved:
- Open the contact profile in Element451
- Add the label: Element451 - Trigger Integration Sync
This will re-run the integration for that record.